Nesting rows and columns
Rows and columns can be nested to create even more complex layouts without positioning components individually.
When a column or row is nested within another, it behaves like any ordinary component: you don’t inform the frame where it is being rendered nor its (x,y) coordinates, only its width and height, if desired.
Below is an example showing the general idea of nesting rows and columns:
cv::Mat frame = cv::Mat(300, 800, CV_8UC3);

// beginRow(cv::mat, x, y, width, height);
cvui::beginRow(frame, 10, 50, 100, 150);
  // Nested column. No frame or (x, y) informed, only width and heigh, i.e. 100 and 150.
  cvui::beginColumn(100, 150);
    cvui::text("Column 1");
    cvui::text("End of column 1");
  cvui::endColumn();

  // Nested column. No frame or (x, y) informed, only width and heigh, i.e. 100 and 50.
  cvui::beginColumn(100, 50);
    cvui::text("Column 2");
    cvui::button("button1");
  cvui::endColumn();
cvui::endRow();
You could omit the width/height of (nested or not) rows/columns, so cvui will calculate its dimensions based on its components:
// beginRow(cv::mat, x, y);
cvui::beginRow(frame, 10, 50);
  cvui::beginColumn();
    cvui::text("Column 1");
    cvui::text("End of column 1");
  cvui::endColumn();

  cvui::beginColumn();
    cvui::text("Column 2");
    cvui::button("button1");
  cvui::endColumn();
cvui::endRow();
Example of row with nested columns
Below is an example of a row whose components are texts, buttons and columns.
// Define a row at position (10, 50) with width 100 and height 150.
// beginRow(cv::mat, x, y, width, height, padding);
cvui::beginRow(frame, 10, 50, 100, 150);
  cvui::text("Row starts");
  cvui::button("here");

  // Column #1 with width 100 and height 150. The next component
  // added will behave like it was added after a component
  // with width 100 and heigth 150.
  cvui::beginColumn(100, 150);
    cvui::text("Column 1");
    cvui::button("button1");
    cvui::button("button2");
    cvui::button("button3");
    cvui::text("End of column 1");
  cvui::endColumn();

  // Add two pieces of text
  cvui::text("Hi again,");
  cvui::text("its me!");

  // Column #2 width 100 and heigth 50.
  cvui::beginColumn(100, 50);
    cvui::text("Column 2");
    cvui::button("button1");
    cvui::button("button2");
    cvui::button("button3");
    cvui::space();
    cvui::text("Another text");
    cvui::space(40);
    cvui::text("End of column 2");
  cvui::endColumn();

  // Add more text
  cvui::text("this is the ");
  cvui::text("end of the row!");
cvui::endRow();
The code above will produce the following on the screen:
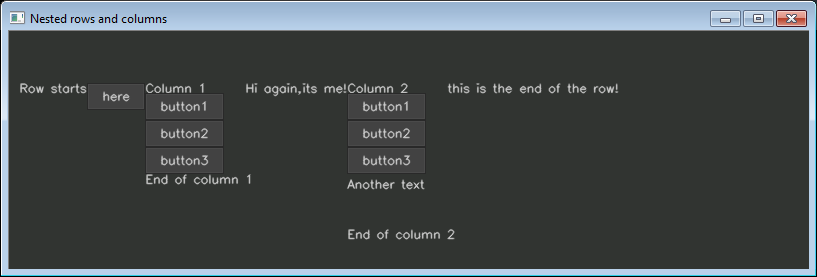
Figure 1: row with several components, including nested columns.
Nested columns (and rows) behave like any other components. In this example, they are placed one beside another by cvui because they belong to a row.
(x,y) coordinates, only width and height, if desired. A nested row/column behaves exactly like any other component within a row/column.Below is the same example as before, however the main row has a padding of 10px and all rows/columns have automatically calculated dimensions:
// beginRow(cv::mat, x, y, width, height, padding);
cvui::beginRow(frame, 10, 50, -1, -1, 10);
  cvui::text("Row starts");
  cvui::button("here");

  cvui::beginColumn();
    cvui::text("Column 1");
    cvui::button("button1");
    cvui::button("button2");
    cvui::button("button3");
    cvui::text("End of column 1");
  cvui::endColumn();

  cvui::text("Hi again,");
  cvui::text("its me!");

  cvui::beginColumn();
    cvui::text("Column 2");
    cvui::button("button1");
    cvui::button("button2");
    cvui::button("button3");
    cvui::space();
    cvui::text("Another text");
    cvui::space(40);
    cvui::text("End of column 2");
  cvui::endColumn();

  cvui::text("this is the ");
  cvui::text("end of the row!");
cvui::endRow();
The code above will produce the following on the screen:
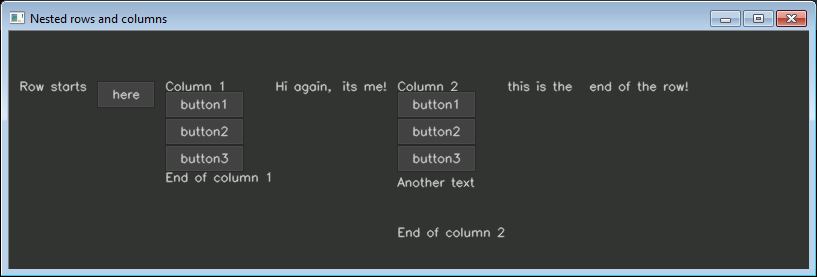
Figure 2: row with components and nested columns. Code is same as in Figure 1, except a padding of 10px and all rows/columns having their dimention calculated automatically by cvui.
More examples
Check out the nested-row-column example for more information about nested rows and columns.